How to make a life-size Spongebob Squarepants
Who lives in a pineapple under the sea? Spongbob Squarepants! Yep, that’s right, you can make your very own life-size look alike of our favorite sea sponge and it’s a lot easier than you might think. So, whether it’s for a party, Halloween or just because your love Spongebob, here’s how to create your very own right now!

Every year, I like to enter a scarecrow into the Scarecrow Festival at Thanksgiving Point’s Ashton Gardens. It’s such a fun tradition during the Halloween season. This year I wanted to create something everyone recognized, something colorful and something fun. Well, Spongebob is definitely all of the above. Here’s how I did it and how you can do it too.

Step #1: The body
You’ll need four pieces of pink insulation foam that are 2 feet x 4 feet. I bought a 4 feet x 8 feet piece at Home Depot for $20 and just cut that with a jigsaw into four 2 feet x 4 feet pieces. It worked perfect.

Next, you’ll want to draw Spongebob onto one of the boards. Maximize the entire space. You’ll be using this as a template for the remainder of this project. It helps to print out a picture of Spongebob for reference.

Finally, working with the foam board that has the drawing of Spongebob, cut out everything except the legs with a jigsaw (see the image below). Use the first board and trace that same shape onto the remaining three boards and cut out the same shape until you have four foam boards that are the exact same shape. If you don’t have a jigsaw, you’ll want to spend $30 and buy one. It will make this project sooooo much easier.

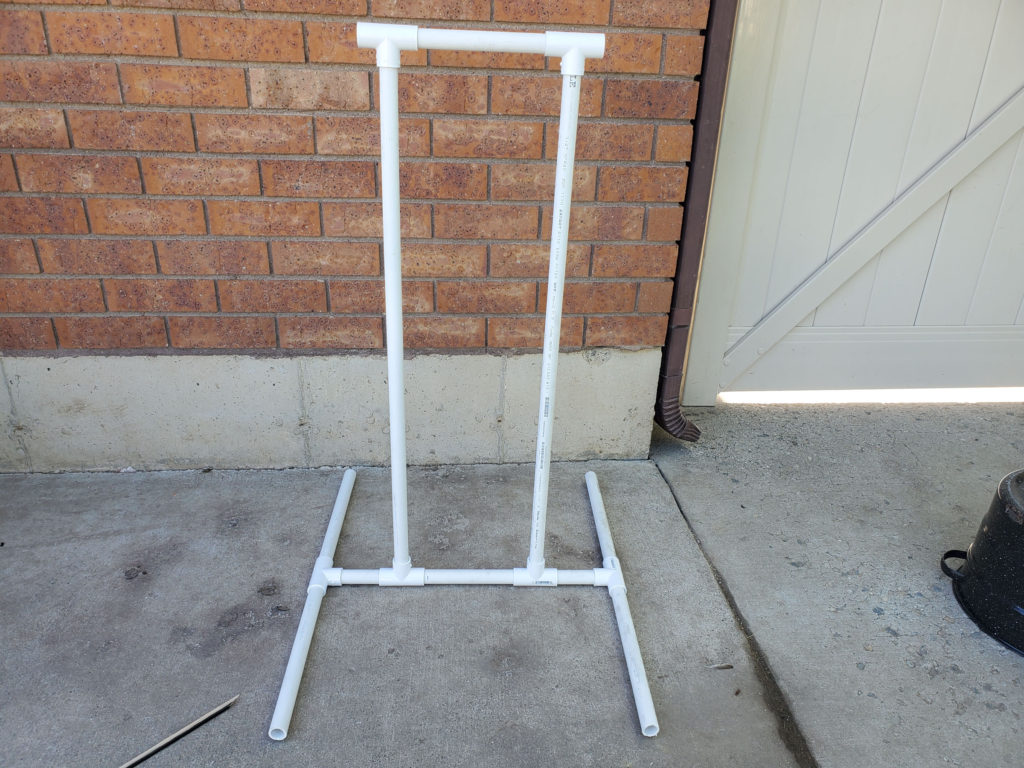
Step #2: The base
Here’s the items that you will need to assemble the base for your Spongebob:
Spongebob’s two legs are going to be made out of PVC pipe. So, basically, just cut your PVC and assemble them based on the image below. The measurements don’t need to be exact. After you’ve cut and assembled your base, glue all of the pieces together with PVC pipe cement. Make sure the legs are facing straight up when you apply the glue because it dries fast!
Step #3: Attached base to Spongebob’s body
Trace the shape of the up three quarters of Spongebob’s legs onto the third layer of foam. Then, cut out the shape that you traced. You should be able to fit the upper part of the base firmly on Spongebob. Then basically glue everything together with Gorilla glue. Take a look at the image below and you can watch my video on how I made Spongebob as well.

Step #4: Paint and add embellishments
Now for the fun part. I bought a small jar of yellow house paint at the store and started painting. Basically, just paint Spongebob the way he is supposed to look. You should have already traced him on the foam insulation, so just fill it in with color. I decided to use a styrofoam ball and cut it in half for his eye balls. If I were to do it again, I would buy a really big styrofoam ball.

I also traced and cut out the arms, shoulders and shoes out of insulation foam. I attached them with a wire and Gorilla glue.

You’re done. I was so happy with the way my Spongebob Squarepants turned out. I am going to keep this little gem and display it on my porch every year for Halloween. Anyway, hopefully this tutorial was helpful. Send me a picture of your life-size Spongebob when you do it yourself!

Related link: DIY Life-size Blobby from Hotel Transylvania


Love it!!! So cute!!
So cute!!
so glad you posted this I repurposed a boat in my yard into bikini bottom it ran into jellyfish fields now I want a sponge bob sitting in it thank you for the tips!
That is amazing!
Sacartelo El Pilin El Niño