How to build beautiful pantry shelves in one day
Building your own beautiful pantry shelves is easier than you might think. With a few simple steps, you’ll be enjoying a brand space in your home that you will LOVE. Take a look!

We are almost done remodeling our house and finishing our pantry was one of the last steps. My husband, being the amazing person that he is, whipped everything together in just one day. Our pantry turned out amazing. Here’s how he did it.

Buy supplies for your pantry shelves
If you don’t want to worry about painting your pantry, you can buy shelves that are already white and the edges are finished. It will make your whole life easier. Here’s the list of stuff you need to buy:
- White laminated shelves
- 1 1/2 inch wood supports
- Large dowel rod (1 1/4 inch)
- 2-inch wood screws
- Nail gun and staples
- Skill saw with guide
- Paddle bit (1 1/4 inch)
- Cordless drill
- Measuring tape
- Paint supplies
Some of these items, such as a nail gun and skill saw might need to be borrowed. But if you choose to buy them it will be well worth the purchase.

Measure and install supports
You’ll need to decide how many shelves that you want and how far apart you want them. I left a little space in between my middle shelves for extra room to store items such as kitchen appliances. Mark the wall to indicate how far apart you want your shelves. Measure the support wood and cut the desired lengths and nail into the studs in the wall.

You just want to make sure that every edge that your shelves touch the wall, there should be support wood nailed to the wall underneath. You can use a stud finder to locate all of the 2x4s behind the drywall.

Cut and install pantry shelves
Next you’ll have to measure your shelves so they are the correct length. Use a a skill saw with a guide and cut them to the correct length.

You’ll want to make sure each shelf fits perfectly snug. After the shelves are placed, use a nail gun to staple the back of the shelves to the corresponding supports below them.
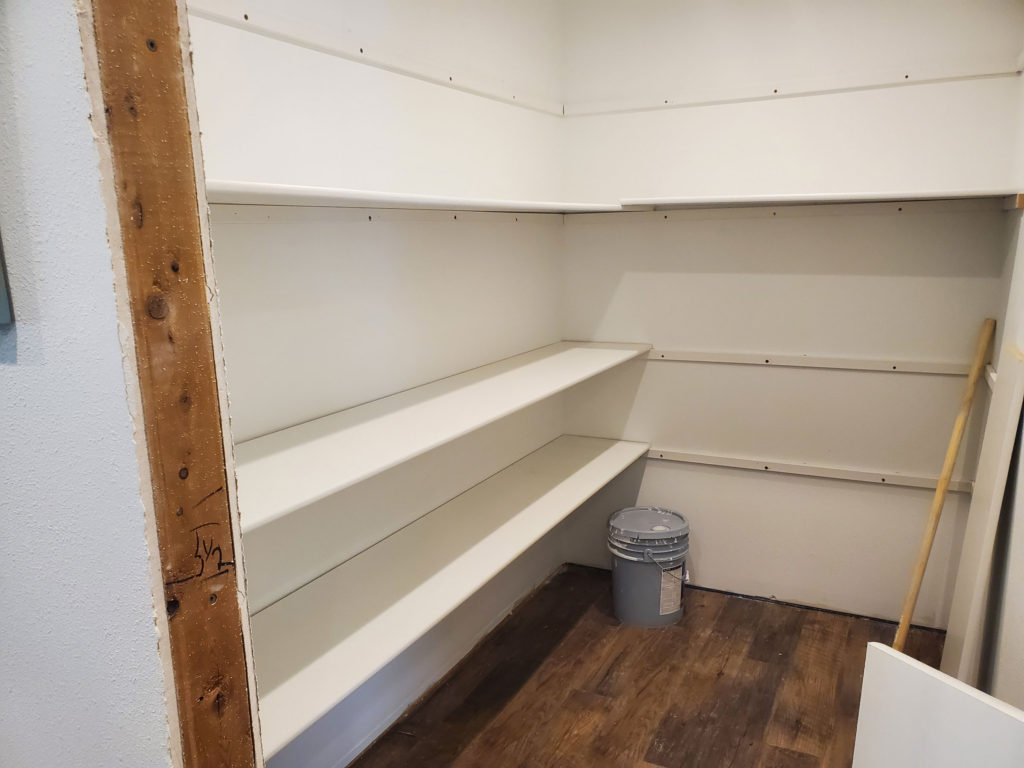
Add dowel supports for each shelf
So, the wood supports nailed along the wall aren’t enough to support the shelves when food and other items are placed on them. My husband added additional supports in two other places: 1) center of the long shelves 2) in the corner where the two shelves meet.

First add a support with a piece of wood (see above) and nail it below the bottom shelf. Then add a 1 1/4″ dowel in between each of the shelves directly above. The dowels will be supported by the bottom piece of wood. You can use a 1 1/4″ paddle bit to drill an indent in the wood for each dowel. You don’t need to drill a hole all the way through. Just enough to insert the dowel.

For the second support, cut a piece of wood and nail in direct under the section in the corner where the two shelves meet. This will provide enough support for the shelves for quite a bit of weight. My five year old climbed to the top of the shelves and they remained strong.

Mud and paint
As a final step, add some caulking over each of the screws and then paint all of the remaining sections that aren’t white. This was my favorite part because I didn’t have to paint that much! It was super slick and easy. And our pantry shelves turned out amazing!!!

I still can’t believe I have such a big pantry. It’s so big in fact that not all of the shelves are filled! I also went an bought some cute baskets that fit perfectly. I just love my pantry so much.
What other home projects have you been working on? Leave your comments below
Related link: 10 things I wish I knew before my kitchen table refinish


Thank you so much for these details, I’m so excited to try! Do you have an estimation of what the project costed? I know it can ebb and flow.